; Niggel: The Cake Slice

Designed by Veethemes.com | Gooyaabi

Latest Posts

Showing posts with label The Cake Slice. Show all posts
I was intrigued when this cake was voted as this months bake. Banana and walnut cake is a classic and so is coffee and walnut, but banana, coffee and walnut was not something I had come across before.

The cake was a plain banana cake, with the coffee and walnut coming in via a smooth meringue based frosting to which you add a nutty coffee spiked puree. I love meringue based buttercreams like this as they are silky smooth and creamy without the usual grittiness you can sometimes get from the more traditional butter and icing sugar buttercreams.

The recipe made a triple layer cake which was far too much for me, so I halved the recipe and baked them as cupcakes instead. You can see from the photos that the walnuts on top of my cupcakes look suspiciously like pecans, which is because they are! Having just bought a bag of pecans I decided to use those instead of walnuts in the buttercream, the flavour combinations still worked together well.

Things got off to a bad start when my digital scales ran out of batteries half way through weighing gout the cake ingredients. It needed a big rectangle battery which I didn’t have. I improvised with a coffee mug and tried to work out American measurements which seemed to work ok. I then didn’t have a sugar thermometer for measuring the temperature of the meringue for the buttercream, and to top it all when I added my nutty coffee concoction to the fluffy mounds of frosting the buttercream split and went very runny. Argh!

I put the buttercream in the fridge for several hours and thankfully it seemed to come together but not quite as light and fluffy as it should do. It tasted divine though, so silky, it just melted in the mouth. I really liked the boozy coffee nutty flavour too (yes there is booze in the buttercream too!)

The cake part however I found slightly disappointing. The cakes were quite dense and closely textured and only had the faintest flavour of banana. I made sure to use ripe bananas too. The super soft and creamy frosting made up for the slightly bland cake though. The cakes were quite moist, but by the following day I found them to be a little dry.
I’m pleased I tried the recipe but I wouldn’t make them again. I love the idea of the boozy nutty coffee cream though, so will try and use these flavours together another time. Click here to see the other Cake Slice Bakers banana cakes

Banana Cake with Coffee Walnut Buttercream
(Recipe from Vintage Cakes by Julie Richardson)
Banana Cake
375g gluten free plain flour
1½ tsp baking powder
½ tsp salt
¼ tsp bicarbonate of soda
3 ripe mashed bananas (around 270g peeled weight)
170ml buttermilk
240g butter
420g caster sugar
1 tbsp vanilla extract
4 eggs

Coffee Walnut Buttercream
120g toasted walnuts (I used pecans)
50ml corn syrup (I used golden syrup)
50ml Bourbon (I used amaretto)
2 tbsp instant espresso powder
6 egg whites
260g caster sugar
¼ tsp cream of tartar
440g butter, cut into small cubes
2 tsp vanilla extract

Banana Cake
Preheat the oven to 180C. Grease and line 3 x 8inch round cake tins.
Mix together the flour, salt, baking powder and bicarbonate of soda and set on one side. In a small bowl mix together the mashed banana, vanilla and buttermilk and set to one side.
In a large bowl, cream together the butter and sugar until fluffy. Add the eggs, one at a time, beating well between each addition.
Add the flour mixture in three batches, alternating with half the banana buttermilk mixture in-between each flour addition.
Divide the batter evenly between the three cake tin and smooth out the surface.
Bake for 28-30 minutes until the cakes spring back when lightly pressed. Allow the cakes to cool in their tins for 30 minutes before turning out onto a wire rack to cool completely.

Coffee Walnut Buttercream
Start by making a nut paste. Puree the toasted walnuts in a food processor until they begin to form a paste. Add the corn syrup, bourbon and espresso and puree until combined. Transfer to a small bowl and set aside.
Now make the buttercream. Lightly whisk the egg whites, sugar and cream of tartar together in a large heatproof bowl. Place the bowl over a pan of gently simmering water and continue to whisk until the mixture becomes white, thick and sticky. It should read 55C/130F on a sugar thermometer.
Remove the bowl from the heat and whisk using an electric mixer, until the mixture has tripled in volume, become glossy and holds a stiff peak. Reduce the whisking speed and continue to beat until the mixture is cool to the touch.
Once cool, keep whisking while slowly dropping in small cubes of the butter. Keep beating until it is all combined.
Add the vanilla and your pre-prepared nut espresso mixture and beat thoroughly to combine.
It can now be used to decorate your cake or covered with clingfilm and left in the fridge for up to two days. If refrigerated, bring the mixture back to room temperature before lightly whisking and using.

Assembly
To assemble the cake, lay one of the cakes, top side up on a serving plate. Spread over around one-fifth of your buttercream and top with another cake layer. Spread this with another fifth of your buttercream and top with the final cake layer.
Use the rest of the frosting to cover the top and sides of your cake.
For a neater finish, allow only a thin crumb coat of buttercream to the outside of the cake before placing in the fridge of firm up for 30 minutes. Then cover the cake with a thicker layer of buttercream.
Store in the fridge. Makes 1 x triple layer 8inch cake.

Notes:
I halved the cake recipe above and ended up with 10 cupcakes. The cake mix doesn’t rise much, so you can fill the paper cases almost to the rim.
I then used only a third of the buttercream recipe to decorate my cupcakes. I also substituted pecans in place of the walnuts.
My buttercream split when I added the nut espresso mixture, but I placed it in the fridge for two hours and then gave it a quick mix before using. It wasn’t perfect, but it did hold together
This month’s Cake Slice bake marks the start of our new cake book, that as a group we will be baking from for the next 12 months. I can now reveal that the book is…Vintage Cakes by Julie Richardson. It’s got a great variety of different cakes to choose form: cupcakes, angel food cakes, bundts and layered cakes.

The books début cake is an intriguingly named Shoo-Fly Cake. It’s a sticky molasses spice cake with a crumb topping. According to the book, it originated in Pennsylvania and was so named due to the cakes sticky top surface which attracted flies, which had to be shooed away!

I used black treacle in my cake which lent a gorgeous deep dark colour and heady aroma. Whenever I smell molasses or treacle it always makes me think of sticky gingerbreads, and indeed this cake does contain some ground ginger. The most surprising ingredient in this cake is a cup of strong brewed coffee. This not only adds a further richness to the cakes mysterious smoky bitter flavour but also enhances the dark inky blackness of the batter.

Before baking the cake is topped with a simple crumb mixture. Strangely, during baking my cake swallowed half the crumb topping on one side of my cake. I’m not sure why this happened on only one side but it resulted in a sort of yin and yang symbol on top, quite fitting I though, a contrast between the dark cake and the lighter crumb topping.

The cake is meant to be eaten warm and it was indeed fabulous like this. Soft, moist and intensely flavoured. On cooling I assumed the cake would be more like a sticky gingerbread, but I found it to be disappointingly dry. When reheated briefly in the microwave it went back to being soft and light, but I wouldn’t recommend eating it cold. I even tried leaving it for 2 days to see if the stickiness would develop, but it only got drier, which was disappointing. However, as the recipe specifies to eat it warm, I suppose I shouldn’t complain.

I also found the crumb topping to be a bit odd. When eaten warm it turned soft and was a bit pointless and when eaten cold, it simply crumbled and fell off the cake. All in all I enjoyed the flavour of this cake, but I probably wouldn’t make it again. I have another gingerbread recipe I much prefer, that tastes delicious eaten hot or cold.

Click here to see the Shoo-Fly Cakes the thoughts of my fellow Cake Slice bakers

Shoo-Fly Cake
(Recipe from Vintage Cakes by Julie Richardson)
Cake
200g caster sugar
170g butter
250g black treacle or molasses
2 tsp vanilla extract
2 eggs
350g gluten free plain flour
2 tsp ground ginger
1 tsp cinnamon
1 tsp bicarbonate of soda
½ tsp salt
225ml warm strong coffee

Crumb Topping
70g light soft brown sugar
100g gluten free plain flour
60g butter

Method – Crumb Topping
Make sure your butter is at room temperature and cut it into small pieces. Mix the flour and sugar together in a bowl. Add the butter and rub it into the flour mixture using the tips of your fingers, like you would if making a crumble.
Work until the butter is broken down and a few clumps of buttery crumbs have formed. Set aside for later.

To Bake the Cake
Preheat the oven to 180C. Grease a 9 inch round deep springform tin and line the base with baking paper.
Mix the flour, salt, bicarbonate of soda and spices together in a bowl and set aside.
Melt the butter and pour it over the sugar, molasses and vanilla. Whisk the mixture until combined. (It will be slightly grainy, this is fine). Whisk in the eggs, one at a time.
Add a third of the flour and fold together. Add half the coffee and mix again. Repeat the process with more flour, coffee and the last of the flour.
Pour the batter into the cake tin (it will be runny) and scatter over the crumb topping.
Bake in the oven for 40-45 minutes until risen and firm to the touch.
Allow to cool for 20-30 minutes before serving warm.
Reheat slices of any leftover cake before eating. Best eaten warm as a pudding and served with custard.
Makes 1 x 9inch cake
October is the last month that The Cake Slice bakers are baking from our current cake book, the suitably titled The Cake Book by Tish Boyle. Keeping to tradition, as it was our last month we were free to choose any recipe from the book we wanted to bake. Looking through the recipes there were so many delicious sounding cakes, but in the end I settled on a simple sounding banana walnut cake. There is something so pleasing about a humble banana cake and seeing as I have some overripe bananas sitting on the counter it seemed like the ideal choice

The recipe made a large 9inch round, but I decided to halve the recipe and bake it in a 2lb (18x11cm) loaf tin instead. Once baked, I decided to forgo the suggested cream cheese frosting as the cake was perfectly moist without it. This made it more of a snacking cake and meant I could keep it at room temperature, rather than in the fridge.

I substituted the flour in the recipe with some gf white teff flour, brown rice flour and a little xanthan gum. However something in my mix was obviously not quite right as the middle of the cake stayed sunken – it didn’t sink on cooling, it never rose in the first place! I’ve had this happen before and found reducing the baking powder helped, I’ll have to try it again and see. The middle was still fully cooked, no raw batter, so I didn’t really mind. It looked more rustic that way (that’s what I’m saying anyway).

The cake was also studded with little chunks of walnut and a few hazelnuts which added a nice crunch. The cake batter itself also contained some cinnamon and brown sugar which helped give it its pleasing golden brown colour and added a wonderful depth of flavour and a warming treacly note against the banana, which itself was quite subtle.

All in all a lovely flavoured cake. The banana and sour cream gave it a lovely soft and tender crumb. It was far too easy to keep going back to cut off another slice.

I’ve really enjoyed the recipes we have baked from The Cake Book, but am now eagerly looking forward to some tasty new bakes our next cake book. Come back next month to find out what it is!

Click here to see the Cake Slice blogroll.

Banana Walnut Cake
(Recipe from The Cake Book by Tish Boyle)
Recipe
180g plain flour (I used a mix of white teff & brown rice flour)
½ tsp xanthan gum (if making gf)
½ tsp baking powder
½ tsp bicarbonate of soda
½ tsp cinnamon
180g butter
150g caster sugar
100g light soft brown sugar
2 eggs
1 tsp vanilla extract
120g sour cream
120g mashed banana (2 small bananas)
55g chopped walnuts, hazelnuts or pecans

Method
Preheat the oven to 170C. Grease a 9inch round deep springform tin and line the base with baking paper.
Mix together the flour, (xanthan gum), cinnamon, baking powder and bicarbonate of soda.
In a separate bowl, beat the butter until smooth and creamy. Add the sugars, a tablespoon at a time, beating until light and fluffy.
Add the eggs, one at a time, followed by the vanilla.
Mix in the mashed banana and sour cream.
Add the dry ingredients and mix gently until the flour is just combined.
Chop the nuts into chunks and stir through the cake mixture.
Pour the batter into the tin and bake for 35 minutes until springy to the touch when gently pressed and a skewer inserted in the middle comes out clean.
Allow to cool in the tin for 15 minutes before releasing from the tin and leaving to cool completely.
Top with a light dusting of icing sugar. You can add a chocolate or cream cheese frosting if you want to be extra decedent.
Makes 1 x 9inch cake

Note: I halved the recipe above and baked it in a 2lb (18x11cm) loaf tin for 25-30 minutes.
I was so excited when this month’s winning cake was this Chocolate Peanut Butter Mousse Cake. I am a great lover of peanut butter and have been rooting/voting for peanut butter cake creations for several years, every time one happens to come up for the vote. Usually, they are outvoted, but this month it won – hurrah!

I have issues with this recipe being labeled as ‘cake.’ There is no baked element in the dessert and nothing spongy about it. To me it is more of a mousse torte or layered cream…pie? Seeing how this is a cake baking group and it’s listed in the book as a mousse cake, I’ve decided to leave it as ‘cake’

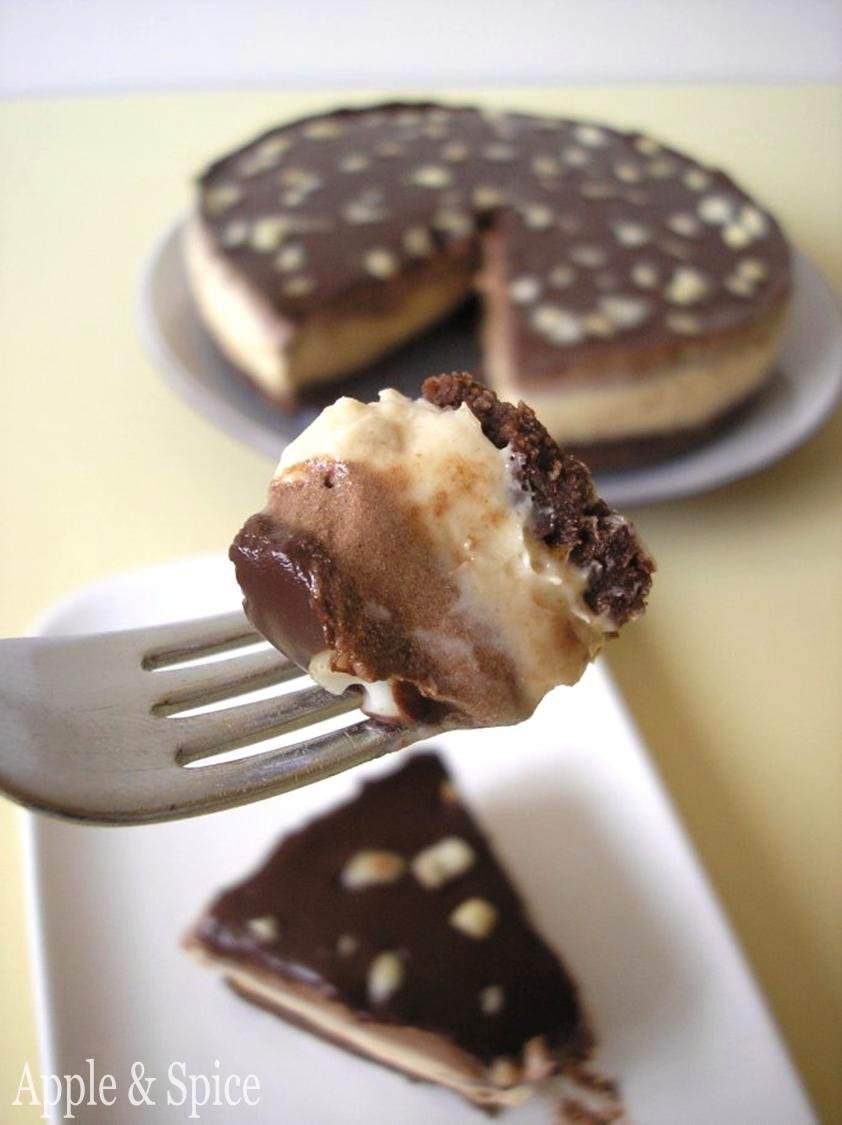
The ‘cake’ itself was quite time consuming to make, being made up of 4 different layers, all which needed mixing and chilling separately. It starts out with a chocolate biscuit base, followed by a creamy peanut butter mousse, topped a dark chocolate mousse and finished with a dark chocolate glaze and a scattering of salted peanuts. Sound good, doesn’t it?!
I’ve made desserts in the past that were quite time consuming and when eaten, they are nice, I’ve felt they weren’t really worth the effort. This mousse cake however, was fabulous and worth every second of preparation. I loved the contrast between the crisp biscuit base and the rich and creamy mousse layers. The peanut butter flavour really shone through and worked so well against the dark chocolate elements. Slightly sweet, but then also a lingering saltiness from both the nuts on top and the peanut butter itself. A delicious creamy, crunchy, sweet and salty combination.

The recipe called for smooth peanut butter, but I only had slightly crunchy peanut butter on hand and I think this actually worked to the cakes advantage. Having a few chips of peanut actually in the mousse layer gave it some texture, as otherwise I think the thick peanut butter and chocolate mousse layers might have been a bit too soft and airy with nothing to bite on. I loved being able to distinguish the different layers.

The cake could probably have done with being left to set overnight rather than just an hour as it was still a little soft on serving, but this didn’t stop it tasting fabulous. Anything peanut butter is a winner in my books and paired against the rich dark chocolate mousse, ganache and base, it was delicious. I also loved that the only element I needed to adapt to make it gluten free was the base, and that the mousse didn’t contain any gelatin, meaning its vegetarian too! A winning ‘cake’ all round.
Next month, October, is our last cake baked from our current cake book by Tish Boyle, and we’re all going to bake the cake of our choice. Then in November we’ll be starting a brand new book for the upcoming year. Now I just need to decide which recipe to choose!

As this is nearly our last cake from our current cake book, we are now opening up group to fellow cake baking enthusiasts who wish to bake with us for the upcoming year. Places are limited and you will need to buy a copy of the new cake book to participate, so dedicated bakers only please.
Anyone wishing to join us can email my new co-host Paloma at (love.for.coffee[AT]gmail.com) along with their name, blog name, blog URL and email address for details. Please put ‘New Cake Slice Member’ in the subject box

Click here to see the Cake Slice blogroll

Chocolate Peanut Butter Mousse Cake
(Recipe from The Cake Book by Tish Boyle)
Chocolate Cookie Crust
180g chocolate cookies (I used GF shortbread cookies)
55 g unsalted butter, melted
10g cocoa powder (my addition as my cookies were plain)

Peanut Butter Mousse
142g cream cheese, softened
30g unsalted butter, softened
144g icing sugar
200g creamy peanut butter (I used finely ground crunchy)
¼ tsp salt
400ml double cream

Chocolate Mousse
142g dark chocolate, chopped
100g milk chocolate, chopped
200ml double cream
80ml whole milk
65g caster sugar
1tsp vanilla extract

Chocolate Glaze
85g dark chocolate
80ml double cream

Garnish
Few chopped salted peanuts

Chocolate Biscuit Base
Have ready a deep 9inch springform pan.
Either blitz the biscuits in a food processor, or put them in a bag and bash them into crumbs using a rolling pin. (Stir through the cocoa powder if using vanilla or plain biscuits) Once crushed, melt the butter, drizzle over the biscuit crumbs and mix well. Press the mixture into the base of the tin and press down into an even layer.
Place in the fridge to firm up while you make the peanut butter mousse.

Peanut Butter Mousse
Beat the cream cheese and butter together until creamy, about 1 minute. Add the icing sugar and mix until well blended. Add the peanut butter and salt and mix until well  combined.
In a clean bowl whisk the double cream at high speed until soft peaks form. Beat half the double cream into the peanut butter mixture using a spatula. Once combined, gently fold the remaining cream in the peanut butter mixture, mixing until no streaks remain.
Spread the mousse onto the chilled biscuit base and spread into an even layer. Refrigerate while you make the chocolate mousse.

Chocolate Mousse
Place the chopped chocolate into a bowl. In a small saucepan, combine the milk and sugar and bring to a boil over medium heat, stirring frequently until the sugar dissolves. Pour the hot milk over the chocolate and stir until the chocolate is completely melted. Stir through the vanilla extract and set aside to cool slightly.
Beat the double cream until soft peaks form. Fold a third into the chocolate mixture and mix well. Follow this by half of the remaining cream and finally the last of the cream. Beat again with an electric mixture to help aerate the chocolate until slightly thickened.
Spread the chocolate mixture over the top of the chilled peanut butter mousse and place in the fridge to set for at least an hour.

Chocolate Glaze
Once the chocolate mousse layer is set, make the chocolate glaze.
Place the chocolate into a small bowl. Heat the cream until steaming hot, but not boiling, and then pour this over the chocolate. Stir gently until the chocolate is melted and mixture is smooth and glossy.
Allow to cool for 15 minutes before using.

Decorate
Run a sharp thin-bladed knife under hot water and wipe dry, then run the knife between the cake and the side of the pan to release the cake; reheat the knife as necessary. Remove the side of the pan. Pour the glaze over the top of the cake and spread out over the surface. Try not to let it drip down the sides. (I spread my glaze on the cake while it was still in the tin, sprinkled it with the peanuts and then let it set for a smoother finish).
Sprinkle the top of the cake with the peanuts and chill in the fridge for at least 1 hour before serving.
To serve, slice the cake with a hot knife, wiping it clean between each cut.
Store in the fridge and eat within 3 days.
Makes a 9inch mousse cake

Note: I halved this recipe and made it in a 6inch round tin.