; Niggel: Pizza

Designed by Veethemes.com | Gooyaabi

Latest Posts

Showing posts with label Pizza. Show all posts
Cauliflower pizza bases have been making the rounds on blogs, and in the news a lot in the past few months. I’m a little late at joining the party as I only made and tasted my first cauliflower base pizza a couple of weekends ago, when I met up with my sister. We like to get together every few months, catch up with each others news and cook something for lunch. Cauliflower pizza is something we have both been longing to try for some time so pizza it was to be!

The base is made of blitzed, lightly cooked cauliflower that is bound together with ground almonds and eggs before being prebaked to form a ‘crust’ on which to spread your pizza toppings. Its gluten free, dairy free, paleo, flourless and grainless so would suit a wide variety of diets. It’s lower carb, is fibre packed and higher in protein than your traditional bready pizza base. So far so good.

After cooking the cauliflower and squeezing out the excess water we were left with a mix that almost resembled a dough. We combined this with the other ingredients to create a thick paste which is then baked. It turned a lovely golden brown colour and smelt really good when baking. Slightly nutty, no sodden cauliflower aroma. You make a little rim around the edge to hold in your toppings and give it that risen crust appearance, which is a nice touch.

After adding our toppings - mushrooms, artichoke hearts, courgette, peppers, olives and a sprinkle of chilli for us - it had a final bake before we tucked in.

We had a slight issue with getting it off the baking parchment, it had stuck in some places and being a softer, not so sturdy veg base rather than a chewy bread dough it was hard to get it off without tearing it. Note to self, next time use a silicone baking sheet, nothing ever seems to stick to them!

Once plated we took our first bites. It was interesting…good interesting but different. It had the flavour of pizza, but without the right texture. The crust was more of a base than an actual crisp crust. It was softer and lighter, slightly coarse in texture and reminded me strongly of a thick oat pancake in texture. It carried the flavours of the pizza toppings well, but you didn’t get that same crunch or chew as you experience from a bread dough base. It was also quite fragile, definitely a knife and fork job, you couldn’t pick it up with your fingers.

I know it sounds like we didn’t enjoy it, but we did! The flavour was delicious and we both agreed if you wanted a change from regular pizza or had a diet that normally prohibited pizza then this would be a great alternative. The base was slightly sweet and nutty, and we didn’t detect any overcooked sodden-sock taste or aroma to the cauliflower, it was very neutral. Nor did it taste overly of almonds or taste like a dessert, something we were a little worried about as it was so almond packed.

It was definitely like eating pizza baked onto a large pancake. Only the very exposed edges had stayed crisp, the rest having softened under the moisture from the sauce and toppings. That aside, we loved it and both agreed that we felt energised all afternoon without that usual bloat or drowsiness that often follows a pizza fest.

I want to make it again but try and tweak the base recipe to make it more of a crispy crust. To me that’s part of what makes pizza so great. We used a recipe from BBC Good Food, but I’ve seen others that don’t use the ground almonds and just use cauliflower and egg for the base. I think they may work better at forming a lighter, crisper, less pancake-like crust. Experimentation ahead!

Have you tried cauliflower pizza? What did you think?

Cauliflower Pizza Base
(Recipe from BBC Good Food)
Base
1 head cauliflower (about 750g)
100g ground almonds
2 eggs, beaten
1 tbsp dried oregano
Salt & pepper
Oil for greasing

Tomato Sauce
2 tsp oil
1 garlic clove, crushed
1 x 220g can chopped tomatoes
1 tbsp tomato purée
½ tsp dried oregano
Small bunch basil leaves
Salt and pepper

Toppings of choice
1 x ball mozzarella
Courgette, mushrooms, olives, peppers, artichoke hearts, chilli etc

Method
Preheat oven to 200C. Line two baking trays with silicone sheets or baking parchment that is greased with oil.
Remove the leaves from the cauliflower and trim the stalk end. Cut into chunks and blitz in a food processor until finely chopped, like rice. (You may need to do this in two batches).
Tip the cauliflower in a bowl, cover with cling film and microwave on high for 5-6 minutes until softened. Tip onto a clean tea towel and leave to cool a little. Once cool enough to handle, scrunch up the tea towel, twist and squeeze out as much liquid as you can. It should feel dry and almost look like dough. Then transfer it into a clean bowl.
Stir in the ground almonds, egg, oregano and seasoning. Mound half the cauliflower mix into the centre of each tray, then cover with a layer of cling film and use the flat of your hand to smooth the mixture out into an 8-9inch round. Pat the edges in to make it a little thicker and create a ‘crust’.
Bake for 15-20 minutes until golden brown and starting to crisp a little at the edges.
Meanwhile, make the tomato sauce. Heat a little oil in a saucepan and fry the garlic until softened. Pour in the tinned tomatoes, tomato puree, oregano and a few leaves of basil. Bring to a simmer and cook gently for 8-10 minutes until thick. Season to taste.
Once the cauliflower base is cooked, set aside to cool a little. Turn the oven up to 240C.
Prepare your toppings of choice. Spread the tomato sauce over the bases leaving a rim around the edge. Arrange your toppings of choice over the top and finish with some blobs of mozzarella. Bake in the oven for 15-25 minutes, depending on how thick you’ve made your bases and how much topping you have piled on!
Once cooked, leave to stand for 3 minutes before using a fish slice or palette knife to remove the pizzas from the tray. Scatter over some more basil leaves before serving.
Makes 2 x 8-9 inch pizzas, or one massive one.
Udi’s are an American gluten free company, and their products became available in the UK a couple of years ago. I was aware of them before they came to the UK, having tasted some of their bagels when visiting a friend in California a few years ago. I loved the bagel and so was delighted when they were one of the first products they introduced to the UKmarket. I have tried quite a selection of Udi’s products now, and they are introducing more and more due to increasing demand. I’ve found some to be a bit hit and miss, but their bagels are probably one of my most regular purchases (especially the choc chip and savoury ones!)

Anyway, enough about bagels. Udi’s have just launched a whole selection of baking mixes and asked if I would be interested in trying some out. Being a good home baker, baking mixes are not something I have bought before, but I was interested to see how they would compare. I was sent a pizza base mix, bread mix, cake mix and flour mix.

Making bread and pizza is quite difficult to achieve gluten free, as breads rely so prevalently on gluten to help give them their texture and structure. It just so happened that the time the mixes arrived, I was looking after my younger brother and so together we decided to try out the pizza base mix for lunch.

I found the ingredient list and method to be a little disjointed across all the range. As I’ve previously mentioned they are an American company, but I would have expected the packaging to have been made more UK friendly, as the extra ingredients required were stated in tablespoons and cups rather than grams. However the total weight of the mix is given in grams and has been given a coeliac UKaccredited logo, so they must have updated the packaging for this. The cooking times too were not consistent, with the pizza base mix being stated in Gas Mark and Degrees Celsius, whereas the white bread mix was provided in Ferinheight only. Another thing I thought was slightly odd is that the instructions tell you use to use the whole bag of pizza mix (570g) which then makes 9 x 6inch pizzas – who needs that many in all in one go?!

Nit picking about packaging aside, I got to work, using only half the mix and was pleased with how quick and easy it was to put together. A bag of flour mix is provided along with a sachet of yeast. Water and oil are the only additional ingredients required.

The instructions state to use a stand mixer, which I don’t own, so I used a spoon and my hands which worked fine. After a short prove I had a lovely soft pizza dough. The instructions say “let rise in a warm area for 40 minutes. Bake for 16-20 minutes at 200C” No mention of when to add toppings (before or after baking), so I went for adding toppings on raw pizza dough and then baking on a preheated baking tray to ensure a crisp base. I suspect this was the right thing to do but I would have liked the instructions to be a little clearer.

I topped my pizza with some leftover tomato salsa, cauliflower, courgette and mozzarella, and finished it with some fresh mint when cooked. Meanwhile, my brother went for a meaty feast of leftover smoked ham, bacon and mozzarella. Both pizzas turned out well. The edges crisped up nicely and turned pale golden brown.

The middle and base of the pizzas were cooked, and had a slight chew which was nice. It was sturdy enough to hold without crumbling apart and wasn’t gritty to eat. Potato and tapioca starch are some of the main flour ingredients in the mix, so I suspect this helped the chew and binding properties. The flavour was good, not too salty, although I did find it slightly sweet for my tastes.

My brother happily devoured his pizza, so it passed the non coeliac eater test. He said it wasn’t quite ‘bready’ enough, but he’d happily eat it.

For ease and convenience I was impressed with the Udi's pizza mix and it’s the kind of thing I would consider buying if I wanted to host or was invited to a mid week pizza making evening with friends. I do however feel more care should have been taken over the units of measure for the ingredients (grams rather than cups) and more consistency given to the cooking temperatures across the range. They should at least be consistent with each other and ideally more geared for the UKmarket.

I look forward to seeing what other products Udi’s develop. I’ve seen on their American website that have cinnamon rolls – please can we try those in the UKtoo!
Last week I spent two very exciting days attending a gluten free baking course at Leiths School of Food &Wine! I’ve was diagnosed coeliac nearly 4 years ago, and although I’ve never allowed it to stop me from baking, I’ve never had any kind of training or professional advice about the best ways of creating gluten free dishes and foods and so decided it was high time I did.

I wanted to learn some special techniques for some of the more complicated/advanced aspects of gluten free baking, rather than just a general beginners gluten free cookery course, which would probably have covered things like cakes and biscuits, which I feel I have mastered pretty well on my own. Instead I selected two individual day courses to combine for a more in depth knowledge of some of the most problematic foods to create when baking gluten free. Day 1 was Gluten Free Bread and Day 2 was Gluten Free Pastry.

The bread course was great fun. We were a fairly small group of only 7 students, meaning we all got to work around the one big table, chat and get to know each other. Being a gluten free course everyone there was either coeliac or had a wheat intolerance. It was so nice to be in a group of people and feel ‘normal’ while we all chatted about our favourite recipes and restaurants and the little bug-bears we have about gluten free. We were 6 girls and 1 male, who along with the female cast of teacher and 2 female assistants was a little outnumbered. David was lovely though and reminded me a bit of Howard from the previous series of Great British Bake Off.

What I enjoyed the most was how hands on it was. Our teacher over both days was a lovely lady called Adriana, a past Leiths student, who started specializing in gluten free after her daughter was diagnosed coeliac. Adriana would show us a recipe, describing the techniques to use and the reasons behind why certain ingredients were used. We were then let loose to create the same recipe ourselves.

First up was gluten free focaccia. When baking gluten free bread you need a sough that it is a lot wetter and softer than regular bread dough. It’s more like a thick paste and you can’t knead it as you would for wheat bread. This is because the wheat flour (and gluten) is replaced with a range of starches and gums that absorb a lot more water, and it needs to be wet enough to allow these starches to become hydrated and rise without being too heavy and dense.

The focaccia recipe also used some ground almonds as one of the ingredients that I thought at first was a little odd, but Adriana explained that this was to help improve the breads protein content. This wasn’t done for health reasons, but for structure. Gluten is the protein found in wheat and so if this is removed, they the structure that makes up the texture of the bread will also change. Adding gums can help replicate the elasticity of gluten, but adding another protein source can also help the structure and texture of some breads – top tip! Makes sense once you think about it.

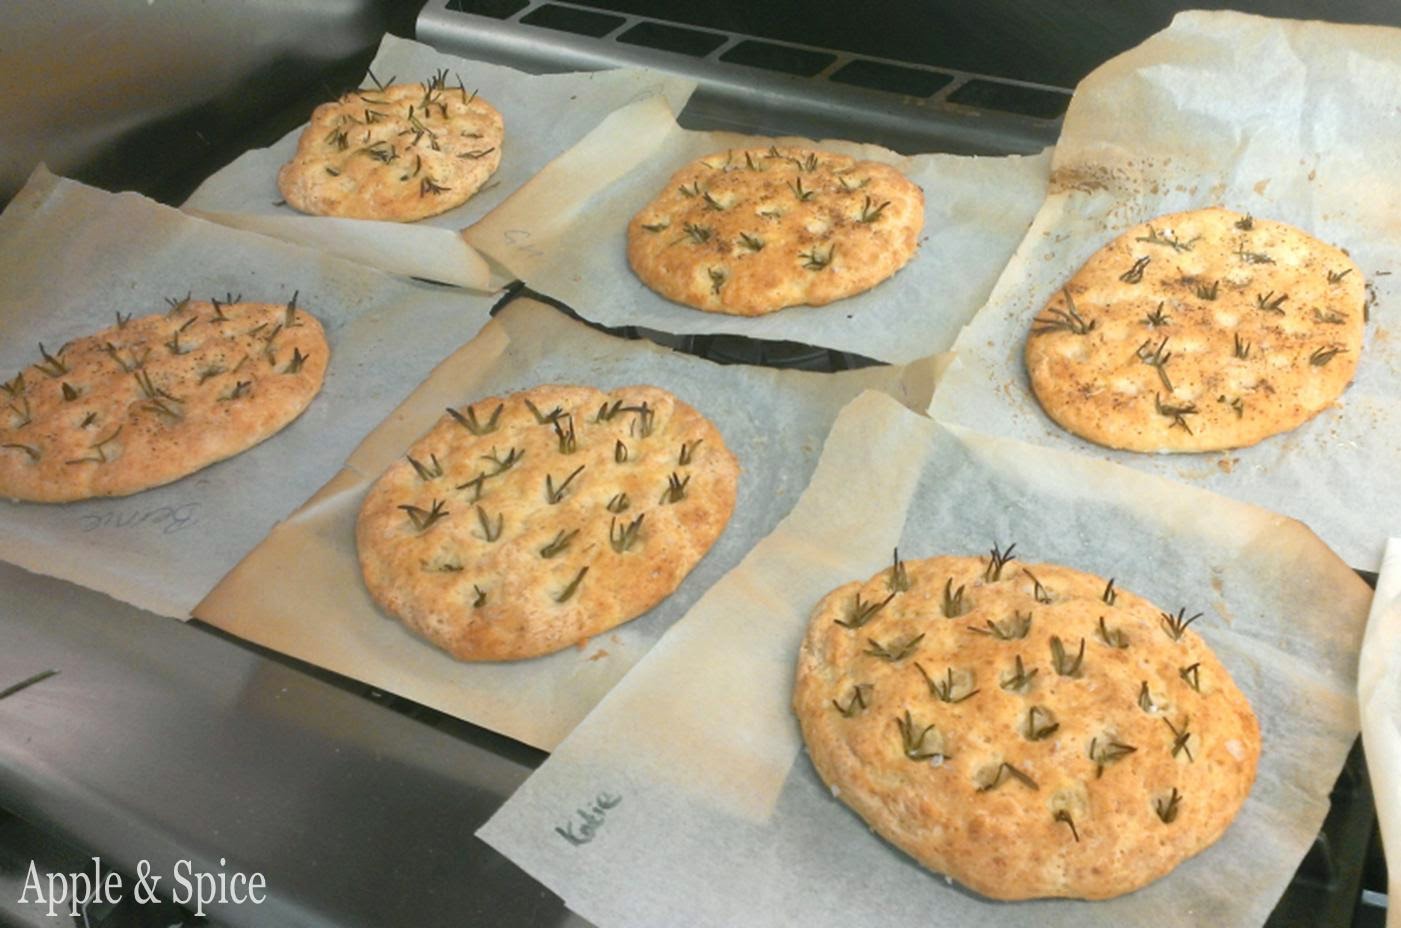
We shaped our focaccia breads by smoothing out the dough with very wet hands, left it to prove, dimpled the top with our fingers to create the characteristic hollows in the top, drizzled with olive oil and decorated with sea salt and fresh rosemary sprigs. A short bake later and we were all bring fantastically crisp and golden focaccias out of the oven. The aroma from the fresh rosemary was mouthwatering.

As always happens it was interesting to see how the same recipe could produce slightly different results for each of us. I was very proud when I was deemed Star Baker for my focaccia!

We hungrily tore off pieces to taste and I was very impressed. The crust was crisp with a great salty flavour and the inside was soft and springy, with well defined air holes that are characteristic of focaccia. The rosemary had given it a wonderful fragrance too. After a quick taste we set them to one side to cool and began work on our pizza bases which would be our lunch.

I worked next to a lovely girl called Kizzy and as the day wore on we discovered we had a lot in common including a love of food and baking. It was such a treat to find a kindred spirit and we helped each other out throughout the day. The recipe for the Focaccia is below and the course also included Pizza, Seeded Crackers, Chai Multi Seed Loaf, Teff Bread, Corn Tortillas and…Brioche!!!

Some of the recipes I felt were more successful than others but the hints and tips and knowledge I picked up throughout the day was wonderful. Adriana and all the staff were so friendly and open with their knowledge and encouraged questions that it was a great day. We got to take all our breads (that we hadn’t previously devoured) home with us.

I was most excited by the brioche. It was meant to be orange and cranberry, but they ran out of ingredients and so instead I improvised with a chocolate chip, sour cherry and freshly ground cardamom version. My brioche loaves were still hot from the oven when I had to run for my train home and so I ended up perfuming the train with the heady scent of cardamom (I got a little over excited and added far too much to my brioche) but it smelt and tasted lovely. The texture was not quite like regular brioche but for a soft buttery yeasty sweet bread it was divine!

Note: I’d highly recommend the course and wanted to point out that I attended the course of my own accord. I was not invited by Leiths to attend, I received no discount on the fees and they never knew I write a food blog.

Next up pastry!

Gluten Free Focaccia (also egg and dairy free)
Ingredients
110g gluten free plain flour (we used Doves Farm plain)
220g cornflour (corn starch)
55g ground almonds
2 tsp salt
2 tsp xanthan gum
2 tsp caster sugar
14g quick active dry yeast
350g/ml tepid water
2 tbsp olive oil, plus extra for drizzling
Fresh rosemary sprigs
1 tsp sea salt for sprinkling

Method
Preheat the oven to 220C. Place a large baking tray into the oven to heat up. Lay a sheet of silicone paper onto your work bench.
Combine the flours, ground almonds, salt, xanthan gum, sugar and yeast into a bowl. Mix well to ensure all combines.
Weigh out the water and add the olive oil. It should be warm but not hot.
Pour most (not all) of the water over the dry ingredients and beat with a wooden spoon until everything is combined. It should be thick but wet to the touch. A few lumps are fine. Beat for 1 minute. You want a wet dough without it being runny, it must still hold a little shape without oozing. Add a little more water if needed.
Turn the dough onto the silicone paper and form into a mound. Dip the whole palm of your hand into a bowl of water and you’re your hand to gently shape and smooth the dough into an oval shape, around 1 inch thick. Keep dipping your hand into the water to smooth it out, it should look very wet and smooth on top when done. Don’t worry its looking too wet.
Once formed, set aside to prove for 20 minutes.
Once slightly puffed, dip your fingers into water and dock the dough to form dimples in the surface, only make the hollows about halfway into the dough, don’t press to the base. Be gentle as the dough will be soft and airy.
Brake off sprigs of rosemary and place some inside each of the hollows. Sprinkle over a generous amount of coarse sea salt and drizzle with a little extra olive oil.
Remove the hot baking tray from the oven and slide the focaccia onto it, still on its silicone paper. Return to the oven and bake for 25-30 minutes until golden.
Remove from the oven and tap the base of the bread, it should sound hollow. If not, bake for a further 5 minutes and test again.

Transfer to a cooling rack to cool. Eat or freeze on day of baking.
It has been many a year since I have eaten at Pizza Hut. It’s hardly the first place you’d think of when planning a gluten free meal out. However, on reading the latest Coeliac UK newsletter I was very excited to learn that Pizza Hut have just introduced a new gluten free pizza. They have worked closely with Coeliac UK to ensure there is no cross contamination and even changed some of their topping suppliers so that all their toppings are gluten free too.

Hearing that something is gluten free instantly makes me want to try it out and so I asked a friend to come with me and do a bit of gluten free research. We ordered our pizzas and the server knew all about the new gluten free base which put me at my ease. When our pizzas arrived I was thrilled to find that all the gluten free pizzas come on square pizza bases – yes square! How cool is that? Not only do they look funky and stylish, but eliminates any doubt that the pizzas had got mixed up with the regular ones. Great idea!

So how did it taste? Very good actually, I was pleasantly surprised. Maybe slightly denser than a regular pizza base, but it wasn’t crumbly, dry, gummy or as hard as a house brick. The base had quite a nice flavour and was thinner than most gluten free pizzas bases I’ve had, which often are so thick you have to spend several minutes sawing through them. There were plenty of toppings and the pizza itself was of a very generous size. It’s lovely to know there is somewhere regular on the high street that I could find a meal, should the need arise, or if I’m out somewhere new. I’m sure my friends will be pleased at the prospect of going out for dinner without having to feel guilty at eating pizza in front of me. Have you tried Pizza Huts square gluten free pizza? What did you think?

I’ve heard Domino’s, Prezzo and Ask are also launching gluten free pizzas – more taste testing trips required I think!

Note: Pizza Hut did not pay or ask me to write anything about them. I was just very excited to discover their new pizza and wanted to share the experience.